> ## Documentation Index
> Fetch the complete documentation index at: https://docs.chattermate.chat/llms.txt
> Use this file to discover all available pages before exploring further.
# Customize AI Agent
> Customize ChatterMate AI agents with custom instructions, personality, and AI or workflow modes for consistent, on-brand support in your company voice.
# AI Agent Customization
Customize your AI agents to provide consistent, on-brand customer support that aligns with your organization's voice and requirements.
 ## Agent Modes
Your AI agent can operate in two different modes:
* **AI Mode**: Traditional AI-powered conversations with customizable instructions
* **Workflow**: Advanced workflow-based responses with conditional logic and automation
## Agent Modes
Your AI agent can operate in two different modes:
* **AI Mode**: Traditional AI-powered conversations with customizable instructions
* **Workflow**: Advanced workflow-based responses with conditional logic and automation
 ## Basic Configuration
### Instructions
Configure detailed instructions for your AI agent to:
* Define how the agent should behave and communicate
* Set guidelines for handling customer interactions
* Establish response patterns and tone
* Use the "Generate with AI" feature for intelligent instruction creation
### Transfer to Human
Enable automatic transfer to human agents when:
* AI agent can't handle the query
* Customer specifically requests human support
* Complex issues require human intervention
When transfer is enabled, you can select specific user groups that can handle transferred conversations.
### Ask for Rating
* Enable/disable automatic rating requests at chat end
* Collect customer satisfaction metrics
* Track agent performance
### Status Management
* Toggle agent between Online/Offline states
* Offline agents won't accept new conversations
* Status is clearly displayed to customers
## Basic Configuration
### Instructions
Configure detailed instructions for your AI agent to:
* Define how the agent should behave and communicate
* Set guidelines for handling customer interactions
* Establish response patterns and tone
* Use the "Generate with AI" feature for intelligent instruction creation
### Transfer to Human
Enable automatic transfer to human agents when:
* AI agent can't handle the query
* Customer specifically requests human support
* Complex issues require human intervention
When transfer is enabled, you can select specific user groups that can handle transferred conversations.
### Ask for Rating
* Enable/disable automatic rating requests at chat end
* Collect customer satisfaction metrics
* Track agent performance
### Status Management
* Toggle agent between Online/Offline states
* Offline agents won't accept new conversations
* Status is clearly displayed to customers
 ## Visual Customization
### Chat Style
Choose from different chat interface styles:
#### Chatbot Style 💬
* Traditional customer support interface
* Features agent branding and formal layout
* Best for business customer support scenarios
* Standard email collection and greeting flow
#### Ask Anything Style 🤖
* Modern AI assistant interface
* Larger, more prominent design with welcome message
* Perfect for general-purpose AI assistants
* Features customizable welcome title and subtitle
* Clean, conversation-focused layout
The "Ask Anything" style provides additional customization options for welcome messages and uses a wider chat interface optimized for AI conversations.
### Welcome Message (Ask Anything Style)
When using the "Ask Anything" chat style, you can customize:
#### Welcome Title
* Personalized greeting for your AI assistant
* Defaults to "Welcome to \[Agent Name]" if left empty
* Maximum 100 characters
#### Welcome Subtitle
* Engaging description of your AI's capabilities
* Defaults to "I'm here to help you with anything you need. What can I assist you with today?"
* Maximum 250 characters
* Supports multiple lines for detailed descriptions
### Colors
Customize the appearance of your chat widget:
#### Background
* Set the background color of the chat interface
* Default color palette available for quick selection
#### Chat Bubble
* Customize the color of chat message bubbles
* Maintain brand consistency with your website
#### Accent
* Configure accent colors for interactive elements
* Used for buttons, highlights, and call-to-action elements
### Typography
#### Font Family
* Choose from system fonts: Inter, system-ui, sans-serif
* Ensure readability and brand alignment
* Consistent typography across all chat elements
All customizations are instantly reflected in the chat preview on the right side of the interface.
## Visual Customization
### Chat Style
Choose from different chat interface styles:
#### Chatbot Style 💬
* Traditional customer support interface
* Features agent branding and formal layout
* Best for business customer support scenarios
* Standard email collection and greeting flow
#### Ask Anything Style 🤖
* Modern AI assistant interface
* Larger, more prominent design with welcome message
* Perfect for general-purpose AI assistants
* Features customizable welcome title and subtitle
* Clean, conversation-focused layout
The "Ask Anything" style provides additional customization options for welcome messages and uses a wider chat interface optimized for AI conversations.
### Welcome Message (Ask Anything Style)
When using the "Ask Anything" chat style, you can customize:
#### Welcome Title
* Personalized greeting for your AI assistant
* Defaults to "Welcome to \[Agent Name]" if left empty
* Maximum 100 characters
#### Welcome Subtitle
* Engaging description of your AI's capabilities
* Defaults to "I'm here to help you with anything you need. What can I assist you with today?"
* Maximum 250 characters
* Supports multiple lines for detailed descriptions
### Colors
Customize the appearance of your chat widget:
#### Background
* Set the background color of the chat interface
* Default color palette available for quick selection
#### Chat Bubble
* Customize the color of chat message bubbles
* Maintain brand consistency with your website
#### Accent
* Configure accent colors for interactive elements
* Used for buttons, highlights, and call-to-action elements
### Typography
#### Font Family
* Choose from system fonts: Inter, system-ui, sans-serif
* Ensure readability and brand alignment
* Consistent typography across all chat elements
All customizations are instantly reflected in the chat preview on the right side of the interface.
 ## Chat Preview
### Real-time Testing
This preview shows exactly how your chat widget will appear to users:
* Test all customizations in real-time
* Verify agent responses and behavior
* Ensure proper styling and branding
* Check functionality before deployment
### Interactive Testing
* Type messages to test agent responses
* Verify knowledge base integration
* Test transfer to human functionality
* Validate rating system behavior
Use this preview to thoroughly test your agent before making it live to ensure the best customer experience.
## Chat Preview
### Real-time Testing
This preview shows exactly how your chat widget will appear to users:
* Test all customizations in real-time
* Verify agent responses and behavior
* Ensure proper styling and branding
* Check functionality before deployment
### Interactive Testing
* Type messages to test agent responses
* Verify knowledge base integration
* Test transfer to human functionality
* Validate rating system behavior
Use this preview to thoroughly test your agent before making it live to ensure the best customer experience.
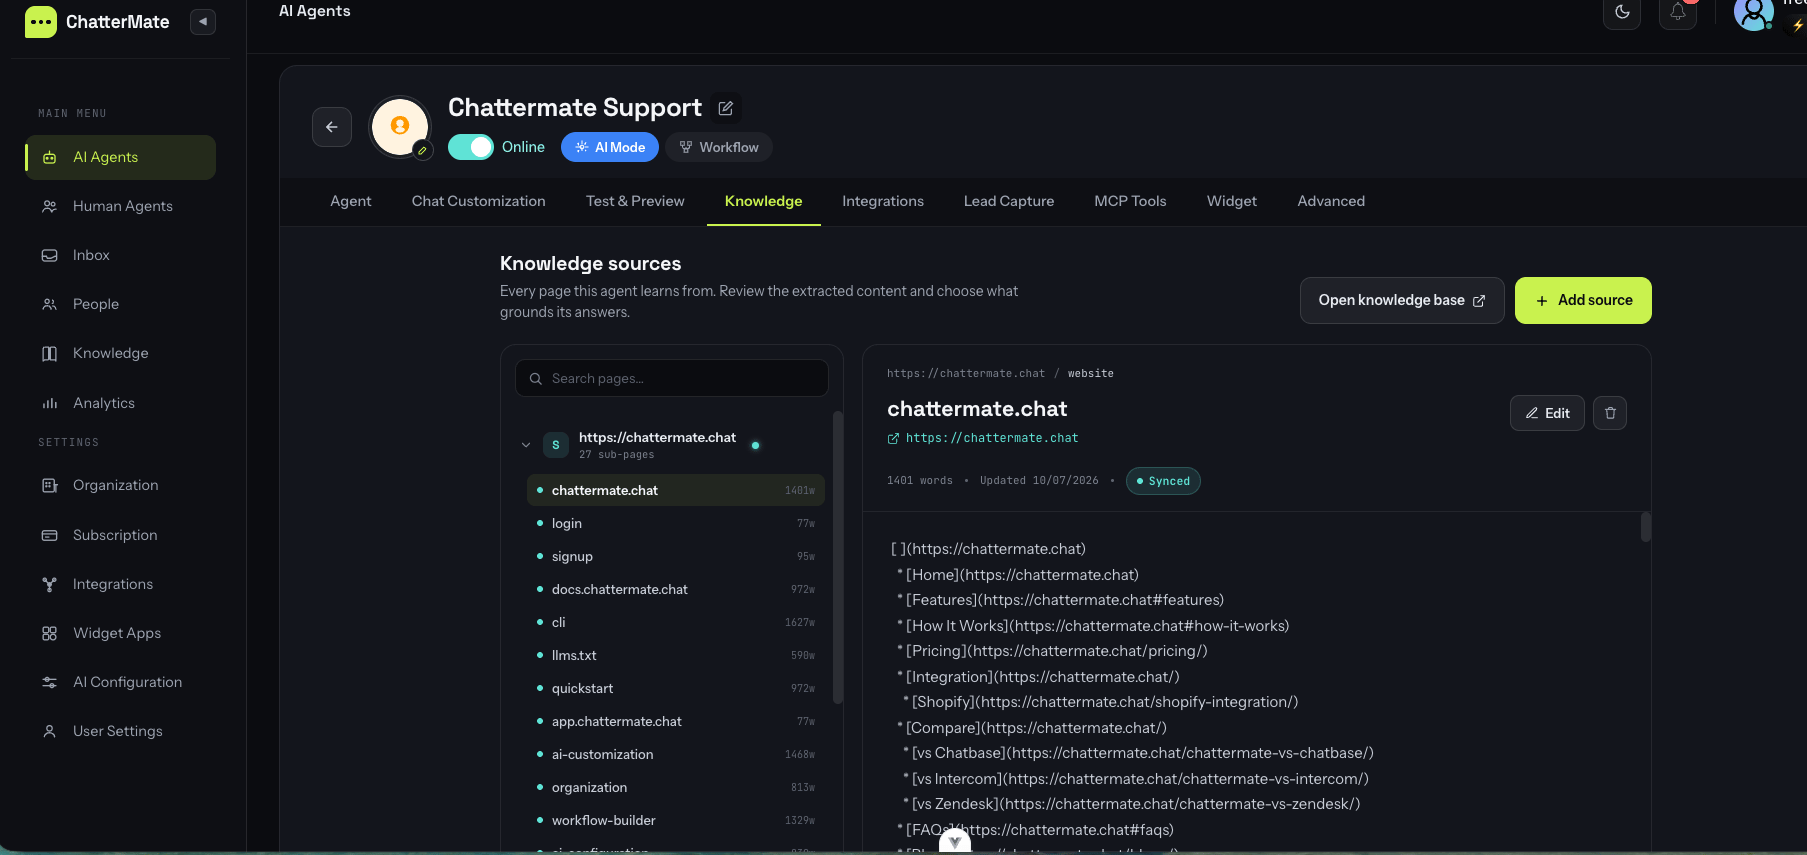 ## Knowledge Sources
Connect your agent to various knowledge sources to enhance its responses with context-relevant information.
### Adding Knowledge Sources
* **+ Add Knowledge**: Upload documents, websites, or other content
* **Link Existing**: Connect to previously configured knowledge bases
### Knowledge Management
View and manage all connected knowledge sources:
* **Source**: Name and origin of the knowledge
* **Type**: Document type or source format
* **Subpages**: Number of indexed pages or sections
* **Created**: When the knowledge source was added
* **Actions**: Edit, update, or remove knowledge sources
Add knowledge sources to improve the agent's responses and reduce "I don't know" scenarios.
## Knowledge Sources
Connect your agent to various knowledge sources to enhance its responses with context-relevant information.
### Adding Knowledge Sources
* **+ Add Knowledge**: Upload documents, websites, or other content
* **Link Existing**: Connect to previously configured knowledge bases
### Knowledge Management
View and manage all connected knowledge sources:
* **Source**: Name and origin of the knowledge
* **Type**: Document type or source format
* **Subpages**: Number of indexed pages or sections
* **Created**: When the knowledge source was added
* **Actions**: Edit, update, or remove knowledge sources
Add knowledge sources to improve the agent's responses and reduce "I don't know" scenarios.
 ## Jira Integration
### Create Jira Tickets
Enable automatic ticket creation for:
* Issues without immediate resolution
* No transfer agent available
* Transfer requests not attended
* Customer follow-ups
* Complex issues requiring tracking
### Configuration
* Select Jira project for ticket creation
* Choose appropriate issue type
* Configure when tickets should be created
Jira connection must be established in settings before enabling ticket creation.
## Jira Integration
### Create Jira Tickets
Enable automatic ticket creation for:
* Issues without immediate resolution
* No transfer agent available
* Transfer requests not attended
* Customer follow-ups
* Complex issues requiring tracking
### Configuration
* Select Jira project for ticket creation
* Choose appropriate issue type
* Configure when tickets should be created
Jira connection must be established in settings before enabling ticket creation.
 ## MCP Tools Integration
Connect external tools and services to your agent using the Model Context Protocol (MCP). These tools extend your agent's capabilities with access to file systems, APIs, databases, and more.
### Adding MCP Tools
* **Create Tool**: Configure new MCP servers and tools
* **Link Existing**: Connect to previously configured MCP tools from your organization
### Tool Management
View and manage all connected MCP tools:
* **Tool**: Name and description of the MCP tool
* **Type**: Transport protocol (STDIO, SSE, HTTP)
* **Configuration**: Connection details and parameters
* **Status**: Enabled/disabled state
* **Actions**: Edit, unlink, or delete MCP tools
### Popular MCP Tools
Choose from pre-configured templates:
* **File System**: Access and manage files and directories
* **Git Repository**: Interact with Git repositories
* **Web Search**: Search the web using Brave Search API
* **Weather**: Get weather information
MCP tools require proper configuration and may need API keys or specific permissions to function correctly.
## MCP Tools Integration
Connect external tools and services to your agent using the Model Context Protocol (MCP). These tools extend your agent's capabilities with access to file systems, APIs, databases, and more.
### Adding MCP Tools
* **Create Tool**: Configure new MCP servers and tools
* **Link Existing**: Connect to previously configured MCP tools from your organization
### Tool Management
View and manage all connected MCP tools:
* **Tool**: Name and description of the MCP tool
* **Type**: Transport protocol (STDIO, SSE, HTTP)
* **Configuration**: Connection details and parameters
* **Status**: Enabled/disabled state
* **Actions**: Edit, unlink, or delete MCP tools
### Popular MCP Tools
Choose from pre-configured templates:
* **File System**: Access and manage files and directories
* **Git Repository**: Interact with Git repositories
* **Web Search**: Search the web using Brave Search API
* **Weather**: Get weather information
MCP tools require proper configuration and may need API keys or specific permissions to function correctly.
 ## Widget Integration
Add the chat widget to your website by copying and pasting the following code:
```html theme={null}
```
Replace `YOUR_WIDGET_ID` and `YOUR_WIDGET_URL` with your actual widget credentials.
### Widget Features
* Responsive design that works on all devices
* Customizable appearance based on Chat Customization settings
* Email collection for visitor identification
* Real-time messaging capabilities
* "Powered by ChatterMate" branding
## Widget Integration
Add the chat widget to your website by copying and pasting the following code:
```html theme={null}
```
Replace `YOUR_WIDGET_ID` and `YOUR_WIDGET_URL` with your actual widget credentials.
### Widget Features
* Responsive design that works on all devices
* Customizable appearance based on Chat Customization settings
* Email collection for visitor identification
* Real-time messaging capabilities
* "Powered by ChatterMate" branding
 ## Rate Limiting
### Enable Rate Limiting
Configure rate limiting to protect your agent from abuse and control traffic:
### Daily Limit
* Set maximum requests per IP address per day
* Range: 10-1000 requests
* Prevents abuse from single sources
### Rate Limit
* Control requests per second
* Range: 1-10 requests per second
* Manages traffic flow and server load
Rate limiting helps prevent abuse while ensuring legitimate users maintain access to support.
## Workflow Mode
When using **Workflow** mode, your agent operates using predefined workflows instead of AI-generated responses. This provides:
* **Structured Conversations**: Guide users through specific paths
* **Conditional Logic**: Route conversations based on user inputs
* **Automation**: Trigger actions based on conversation flow
* **Consistency**: Ensure standardized responses for common scenarios
Switch between AI Mode and Workflow using the toggle buttons at the top of the agent configuration.
Learn how to extend your AI agent with external tools and services
Next: Learn how to create advanced conversation workflows
Learn how to enhance your AI agent with domain knowledge
## Rate Limiting
### Enable Rate Limiting
Configure rate limiting to protect your agent from abuse and control traffic:
### Daily Limit
* Set maximum requests per IP address per day
* Range: 10-1000 requests
* Prevents abuse from single sources
### Rate Limit
* Control requests per second
* Range: 1-10 requests per second
* Manages traffic flow and server load
Rate limiting helps prevent abuse while ensuring legitimate users maintain access to support.
## Workflow Mode
When using **Workflow** mode, your agent operates using predefined workflows instead of AI-generated responses. This provides:
* **Structured Conversations**: Guide users through specific paths
* **Conditional Logic**: Route conversations based on user inputs
* **Automation**: Trigger actions based on conversation flow
* **Consistency**: Ensure standardized responses for common scenarios
Switch between AI Mode and Workflow using the toggle buttons at the top of the agent configuration.
Learn how to extend your AI agent with external tools and services
Next: Learn how to create advanced conversation workflows
Learn how to enhance your AI agent with domain knowledge